Stations
The Stations tab presents all the chargers created in e-PowerUP! – Mobile App to your customer. Also, the customer can start a charging session on an available charger’s connector.
List view
Under the list view, all the chargers created in e-PowerUP! are listed. The list is ordered by the most recently created charger.
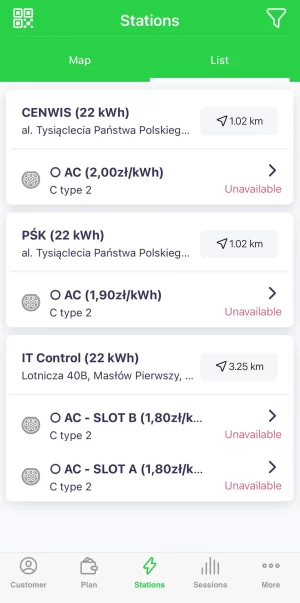
Figure 1: Stations list view
Additionally, in the list view, the charger’s connectors are shown under each charger; it includes the connector type and charging status. Furthermore, the customer can see the driving distance away from the charger.
The connector types are standardized types that let your end users know whether or not the connector is compatible with their vehicle.
To get directions on how to navigate from your current location to a particular charger, from Figure 1: List view, click Navigate.
Starting a charging session
To start a charging session, from Figure 1: List view] or Figure 5: Map view, click on the connector of a charger: this takes you to the connector details screen.
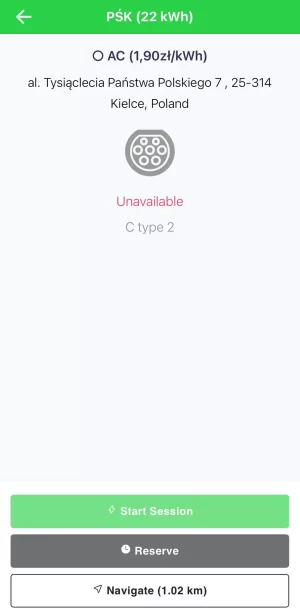
Figure 2: Connector details
To go back to the previous screen, click Back.
From Figure 2, clicking Start Session will start a charging session using the connector of that charger.
Figure 3: Charging session
For a charging session to start successfully in the e-PowerUP!– Mobile App, the customer must:
Have their vehicle plugged in before clicking Start Session. Otherwise, the customer will get a message saying the vehicle is not connected.
Add a credit card to their account if they have a pay-now or pay-as-you-go payment type. To add a credit card in the e-PowerUP!– Mobile App, see Adding a credit card.
- For a customer with a prepaid payment type, their wallet must have been funded through a credit card or voucher before they can start a charging session.
To learn more about each payment type, see Choose a payment type and plan.
During the charging session, the customer sees the duration of the session, the delivered energy, the estimated cost, and the power currently being delivered, all in real-time.
Multiple parameters can determine the cost—for instance:
- Rating by charge time
- Rating by the energy consumed
- Rating by idle time (parking)
Also, during the charging session, the vehicle’s charge state can be shown if the charger can provide that information to the e-PowerUP!– Mobile App.
To go back to the previous screen, from Figure 3, click Back; to end the charging session, click End Session. Clicking End Session will stop and charge the session unless parking/idle fees are enabled. In that case, the session will stop when the vehicle connector is unplugged.
At the end of each charging session, the customer is shown a summary that includes the charger and connector used.
In addition, the summary shows the date, time, duration, quantity (total amount of energy stored in the vehicle’s battery from the session), price per unit, and the total amount to be paid for the charging session.
The total amount paid for the charging session is obtained by multiplying the price per unit by the quantity.
Figure 4: Charging session summary
The charging session summary can also be viewed later in the e-PowerUP!– Mobile App. For more information, see Charging session history.
Reserving a connector
The customer can reserve a connector. To acheive this, from Figure 2: Connector details, click Reserve.
Typically, a charger usually has a single connector. Therefore, reserving a connector also means the charger is automatically reserved. However, some chargers can have multiple connectors.
A connector reserved by a customer in the e-PowerUP!– Mobile App will lock the connector for a short period. This implies that other users will not be able to use the connector; it is shown as a reserved/unavailable connector for the rest of your users.
Map view
Under the map view, instead of the chargers presented to the customers on a list, the chargers are shown on a map. You can also search by location.
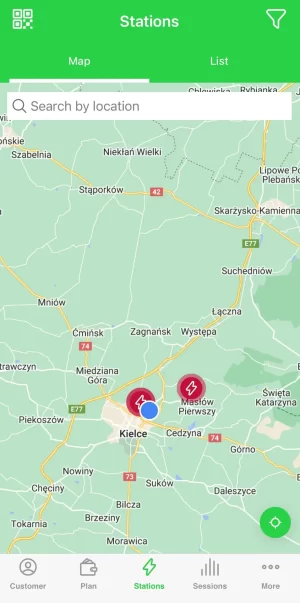
Figure 5: Stations map view
By selecting a specific Charger on the map, the charger’s connectors are shown; it includes the connector type and charging status. Furthermore, the customer can see the driving distance away from the charger.
The connector types are standardized types that let your end users know whether or not the connector is compatible with their vehicle.
To learn how to start a charging session in the e-PowerUP!– Mobile App, see Starting a charging session.
Filter for a connector
To filter for a connector based on the minimum power that a connector can supply, from Figure 1: List view or Figure 5: Map view, click Filter.
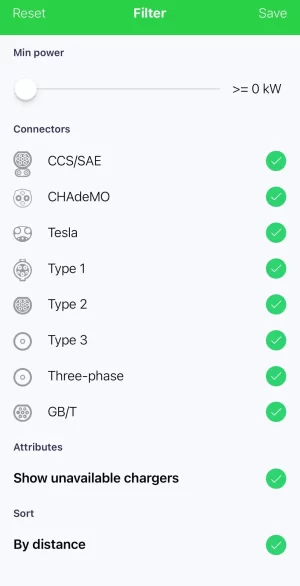
Figure 6: Filter connectors
Scanning a QR code
The customer can also scan a QR code to start a charging session. To active this, from Figure 1: List view or Figure 5: Map view, click QR Code.
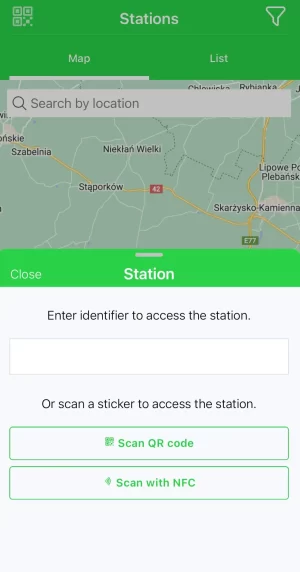
Figure 7: QR code
Enabling your customers to start a charging session by scanning a QR code is encouraged because it requires more validation, as it typifies that the customer is at the charging location.
After scanning the QR code, the e-PowerUP! – Mobile App checks if a vehicle is connected to the charger. If there is, it is assumed that to be the customer. Then, the customer is taken to Figure 2: Connector details in the e-PowerUP!– Mobile App, from where they can start the charging session.
Similarly, from Figure 7: QR code, the customer can also enter a station number to start a charging session. The station number refers to the code given to the charger when it was created in e-PowerUP!– Mobile App. For more information, see Create charger.
The customer can as well scan with NFC to start a charging session. To acheive this, from Figure 7, click Scan with NFC.
